
Fallen Lineage Solo Berserker Build
Last updated:
Start as Warrior and build enough HP and recovery to support Berserker's health-spending abilities. Combine Strength, Bleed healing, lifesteal, and recovery when enemies fall, then choose your weapon around the fights ahead.
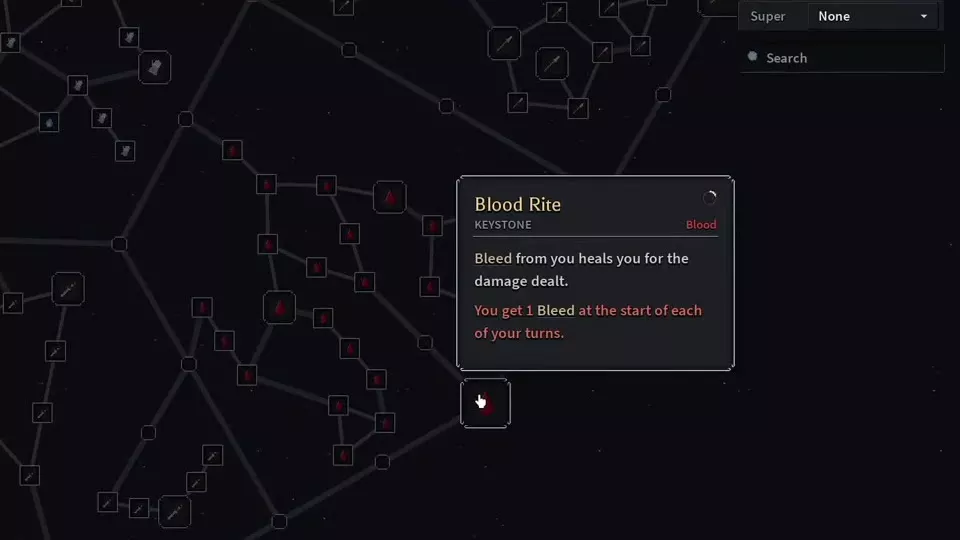
Prioritize Strength, HP, healing, and Bleed. Use Blood Rite for Bleed-based healing, Red Harvest for recovery when enemies fall, and Second Breath for a once-per-fight heal. After unlocking Berserker, Vampiric Frenzy adds 15% lifesteal during Frenzy, while Onslaught rewards a hit that downs an enemy with an immediate extra action once per turn. Favor Bloodfever Blade for straightforward lifesteal, weigh Redmane Warblade's stronger bonuses against its 40% healing penalty, or choose Gloomthorn for Bleed and Rupture. Against Bloodless enemies, rely on direct damage and recovery that does not require Bleed.
Build Around HP and Recovery
The solo Warrior-to-Berserker build works around three priorities: a larger HP pool, damage that restores health, and recovery that keeps you fighting without a healer.
Invest in Strength to improve maximum HP and Strength-scaled skills. Build toward Blood Rite, Red Harvest, and Second Breath through their connected passive routes. At the Berserker stage, use Frenzy-based lifesteal and takedown actions to turn offensive turns into recovery opportunities.
Choose equipment by its contribution to that loop. A stronger low-HP damage bonus is useful only while you retain enough health and recovery to pay your ability costs and survive the next attack.
Choose Your Start and Unlock Berserker
Choose Warrior as your starting class and Exile for its +20% Strength bonus. Each point of Strength grants 3 maximum HP and increases damage and healing from Strength-scaled skills by 1%.
Sobekan and Tebtun provide optional bonuses:
| Choice | Type | Relevant bonuses |
|---|---|---|
| Sobekan | Race | +5% max HP; +5% Strength |
| Tebtun | Lineage | +5% max HP |
Sobekan also grants Lie in Wait. With this ability, Focus grants 1 Counter alongside its Energy recovery. A melee-triggered Counter retaliates with Attack and consumes one Counter; a successful counter hit applies Taunted for 1 turn. This gives a recovery turn an offensive follow-up.
To reach the Super stage:
- Reach Level 20.
- Reach 20 in the required alignment.
- Complete the Trial in the Portal.
- Open Tree, select Berserker from the Super menu, and allocate eligible connected nodes with available points. Click Apply to commit them.
Selecting Berserker in the dropdown displays its nodes; unlocking the specialization and spending points are separate requirements.
Choose Weapons and Accessories
These one-handed swords require Warrior. The comparison below uses their Tier 1 requirements and damage ranges.
| Weapon | Level | Damage | Lifesteal | Low-HP damage |
|---|---|---|---|---|
| Bloodfever Blade | 5 | 21–25 | 3%–5% | +30% |
| Redmane Warblade | 7 | 24–28 | 6%–9% | +50% |
| Gloomthorn | 9 | 26–30 | — | — |
Bloodfever Blade is the straightforward sustain choice. It combines lifesteal with a low-HP damage bonus without Redmane's healing-received penalty. Look for it in the Market.
Redmane Warblade trades recovery efficiency for stronger offensive and lifesteal bonuses. It reduces healing received by 40%. Choose it when you want its higher damage and low-HP bonus, while accounting for weaker incoming healing. It is available through the Trading Post and Market. Equipment alignment requirements were removed; level and class requirements still apply.
Gloomthorn supports the Bleed-and-Rupture route. Its effects include:
- 25% chance on hit to apply Bleed 2.
- Vulnerable 3 on a critical hit.
- 35% more damage against Vulnerable targets.
- A 20% Rupture bonus.
- At Level 9, Tier 1: a 10%–14% critical chance modifier and 30%–40% critical damage bonus.
Establish Bleed before applying Vulnerable or Sunder to trigger Rupture. Rupture immediately deals all Bleed damage with a 50% increase, then ends Bleed. This converts ongoing Bleed pressure into immediate damage; apply Bleed again to rebuild that pressure.
For accessories, choose the effect your setup needs:
| Accessory | Requirement | Build contribution |
|---|---|---|
| Antler Ring | Level 1 · Tier 1 | +5–8 maximum HP |
| Bloodstone Ring | Level 12 · Tier 2 | HP and lifesteal |
| Serpent Coil | — | Bleed application |
Antler Ring is an early option for increasing your health pool. Bloodstone Ring combines 7.5–11.3 maximum HP with 2%–3% lifesteal. A Grade C offer at The Keepers' Trade costs 90 Gold and provides 9.3 HP, 2.9% lifesteal, and 4.2% increased healing done; those exact values belong to that Grade C item.
Serpent Coil gives a 30% chance on hit to apply Bleed 3. Choose it when establishing Bleed is more useful to your setup than another HP or lifesteal bonus.
Keep the class requirement in view when comparing weapons: Redfang Greatsword requires Knight Super, so it does not fit this Berserker loadout.
Build Your Recovery Core
Open Tree and work through connected nodes toward the recovery effects below. Select reachable nodes with available points, then click Apply to save the allocation.
| Node | Trigger | Recovery |
|---|---|---|
| Blood Rite | Your Bleed deals damage | Heals for damage dealt |
| Red Harvest | An enemy falls | 8% of maximum HP |
| Second Breath | HP falls below 35% | 20% of maximum HP |
Blood Rite makes Bleed you apply heal you for the damage it deals. It also applies 1 Bleed to you at the start of each of your turns. Bleed damages its bearer when they use Attack or a skill, so this node adds a health cost to your own offensive turns as well as a recovery source from enemies.
Red Harvest supports fights with several enemies. Finishing a weakened target restores health before you continue fighting the survivors. Its trigger is an enemy falling, rather than a requirement that your direct hit deliver the final blow.
Second Breath supplies a fallback when HP falls below 35%, but triggers once per fight. After it activates, plan subsequent turns around your repeatable recovery sources.
For longer-term Bloodline Hall development, consider:
- Last of the Line: grants 3% maximum HP and 3% damage while alone, directly supporting solo runs.
- Bloodthirst: heals you for 0.5% of damage dealt, adding recovery tied to your offense.
Use the passive tree guide for connected allocations, applying points, resets, and tree codes.
Run the Frenzy Loop
Use the following sequence with the relevant Berserker nodes allocated:
- Check your health before Blood Frenzy. It requires current HP equal to at least 15% of maximum HP and costs 15% of maximum HP. Treat that as an activation minimum, not a comfortable health reserve.
- Attack during Frenzy to use Vampiric Frenzy. This node grants 15% lifesteal while Frenzy is active.
- Track Energy gained through Pain Engine. It grants 1 Energy for HP loss equal to 15% of maximum HP, up to 2 Energy per turn. Account for that limit before spending health to support further actions.
- Finish a weakened enemy with a hit to trigger Onslaught. You immediately act again, once per turn. With Red Harvest allocated, an enemy falling also restores health.
- Choose the next attack by the remaining targets. With Rampage allocated, Reckless Swing hits every enemy for 70% of its damage each. Use it to spread damage across a group; focus a weakened target when securing the takedown and extra action is the more useful result.
Against several enemies, recovery on enemy falls and Onslaught provide strong reasons to finish targets. Onslaught still grants only one extra action per turn, even if further hits down more enemies.
Against a lone durable enemy, there is no takedown to fuel that loop until the enemy falls. Rely on Frenzy lifesteal, weapon recovery, and Bleed healing while preserving enough HP for incoming damage.

Handle Bloodless and Low-HP Risks
Bloodless prevents Bleed and Poison. Against these enemies, use direct damage and recovery from lifesteal, Bloodthirst, Second Breath, or enemy falls. Your Bleed-to-Rupture setup cannot work on a target that cannot receive Bleed. Check the enemy trait directory when choosing your damage plan.
Avoid Martyr for this solo sustain setup. It redirects 25% of allies' damage to you and reduces damage you take by 20%, but reduces healing you apply to yourself by 50%. Solo play gives you no teammates to protect, while the self-healing penalty works against the build's recovery goal.
When using Redmane Warblade, plan around its 40% reduction to healing received. Its stronger lifesteal and low-HP damage bonuses come with that cost; do not choose it solely for the larger displayed percentages.
Undying Rage is a limited safeguard. During Frenzy, it prevents HP from falling below 1, works once per fight, and costs 10% of maximum HP when Frenzy ends. Recover before Frenzy expires and leave room for that health loss. Do not treat its 1-HP floor as permanent protection or spend health as though it remains active throughout the fight.
Gear and Progression References
- Weapons: compare weapon requirements, effects, and acquisition options.
- Armor and accessories: find equipment by slot, level, and Tier.
- Super unlocks and abilities: follow alignment, Portal Trial, and specialization progression.
- Bloodline Hall upgrades: develop Last of the Line, Bloodthirst, and other permanent bonuses.