
Fallen Lineage Combat Guide: Energy and Skill Checks
Last updated:
Choose actions that remove threats, preserve Energy, and prepare your next turn. Read each target's preview before committing, then use the timing prompt and combat Log to understand the result.
Attack costs no Energy. Skills spend Energy and must be ready; Focus uses your action to restore 2 Energy. Compare previews for each enemy, press Space when Lunge's rings meet, and practice selected skills at the Training Yard.
Turns, Attack, and Focus
Follow the turn-order bar at the top of the screen and the highlighted current actor. The interface displays a countdown and action states: Choosing identifies action selection, Aiming identifies target selection, and Skill Check identifies the timing input. During an ally's turn, read their current action and prepare your own target choice.
On your turn:
- Choose Attack, then select an enemy for a basic attack without spending Energy.
- Open Skills to inspect your equipped abilities, current Energy, costs, and availability. Select an available skill and its target.
- Choose Focus to recover Energy instead of attacking. It restores 2 Energy and advances the turn.
Not enough Energy means you need a cheaper action, a free Attack, or Focus. Not ready yet is a separate readiness restriction: having enough Energy does not make that skill available. Stun causes a lost turn, so a stunned character does not receive a normal action.
Use Party and Enemies to inspect combatants, Stats to inspect attributes, and Log to read actual damage, critical hits, blocks, dodges, status changes, and defeated targets. Before each boss, use the preparation pause to switch items and spend points.
2 objects
| Name | Action type |
|---|---|
|
Basic attack
| |
| |
|
Energy recovery
| |
| |
Read the Target Preview
Select Attack or a skill, then point to an enemy before committing. Read these parts together:
- Cost: Energy required for the action; Attack is marked Free.
- Damage: the ordinary damage amount and its type, such as Physical.
- Hit chance: the chance to hit that particular target.
- Crit chance: the critical-hit chance and the damage of that outcome.
- Block chance: the target's block chance and the reduced damage of that outcome.
- Target HP: projected remaining HP. Defeated here describes the projected result.
- Scaling and effects: the contributing attribute, damage bonus, and accompanying status effects.
Compare Attack with a skill
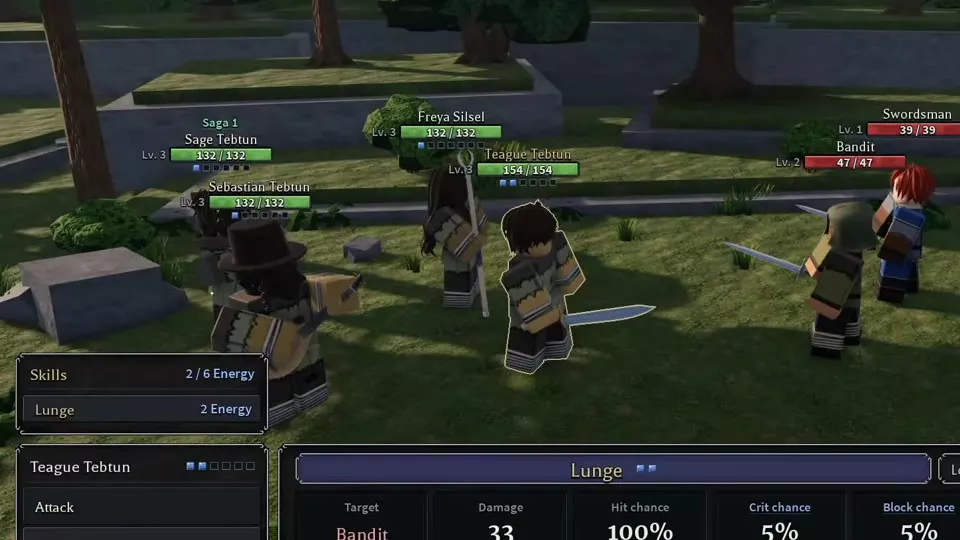
With Teague's Strength +10% damage setup against Bandit, the previews read:
| Action | Cost | Physical damage | Hit chance | Critical outcome | Block outcome | HP left |
|---|---|---|---|---|---|---|
| Attack | 0 Energy | 22 | 95% | 5% · 33 damage | 5% · 13 damage | 25 |
| Lunge | 2 Energy | 33 | 100% · No dodge | 5% · 49 damage | 5% · 20 damage | 14 |
Lunge offers more damage and removes the dodge risk in this comparison, but it spends Energy. No dodge does not prevent blocking: this Bandit still has a 5% chance to block Lunge.
Switch targets before deciding. In the same Strength +10% Lunge setup, Bandit is projected to have 14 HP left, Swordsman 6 HP left, and Brigand is marked Defeated. Their HP and defenses make the same skill produce different tactical results; inspect traits before choosing the projected kill.
With Haste, the Attack damage preview includes its second hit. Bullseye also has a critical estimate in the combat interface. After executing an action, read the Log for the actual outcome. For attribute allocation and critical-chance calculations, use Stats, Scaling, and Critical Chance.
Complete a Skill Check
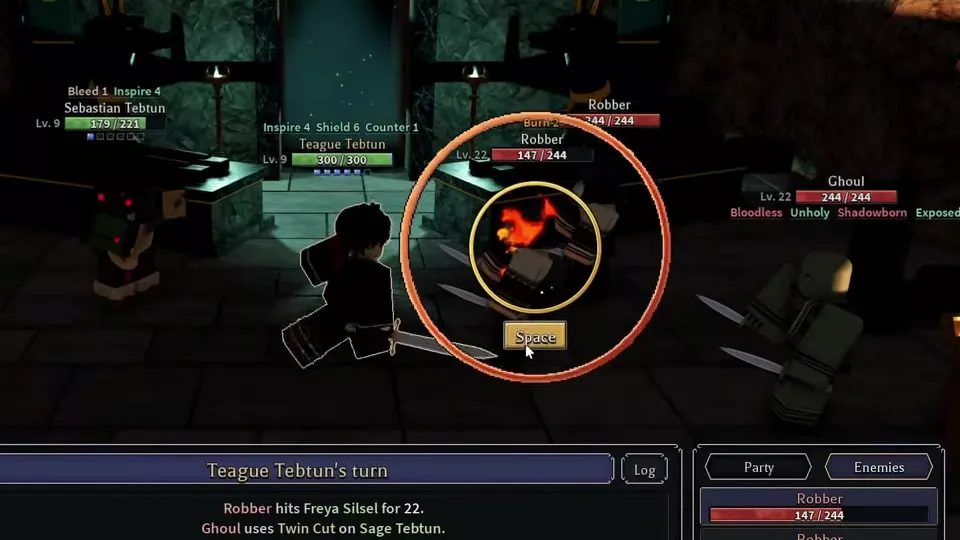
For the ring check used by Lunge:
- Select the available skill and its target.
- Watch the moving ring approach the target ring.
- Press Space as the rings meet.
- Read the timing grade, then check damage and status results separately.
Miss, Good, and Perfect are timing grades. A timing Miss does not automatically mean the attack dealt zero damage. Dodge and block are separate combat outcomes.
In the initial tutorial setup against Bandit, Lunge previews 18 damage: a Miss timing result deals 14 damage, while a later Good result deals 18. Against a Level 22 Robber, a Lunge preview of 56 damage is followed by a Perfect result and 73 actual damage. Use the current preview and Log when judging your own attack.
Bard uses a different, note-based check with notes moving downward. Follow that check's on-screen prompts rather than applying Lunge's ring input to it.
Manage Energy and Target Order
Choose between damage and recovery
Compare the next useful skill's cost with your current Energy. Lunge costs 2 Energy and Pommel Strike costs 1 Energy. If a free Attack finishes the enemy, use it and save Energy for a target that needs the stronger skill.
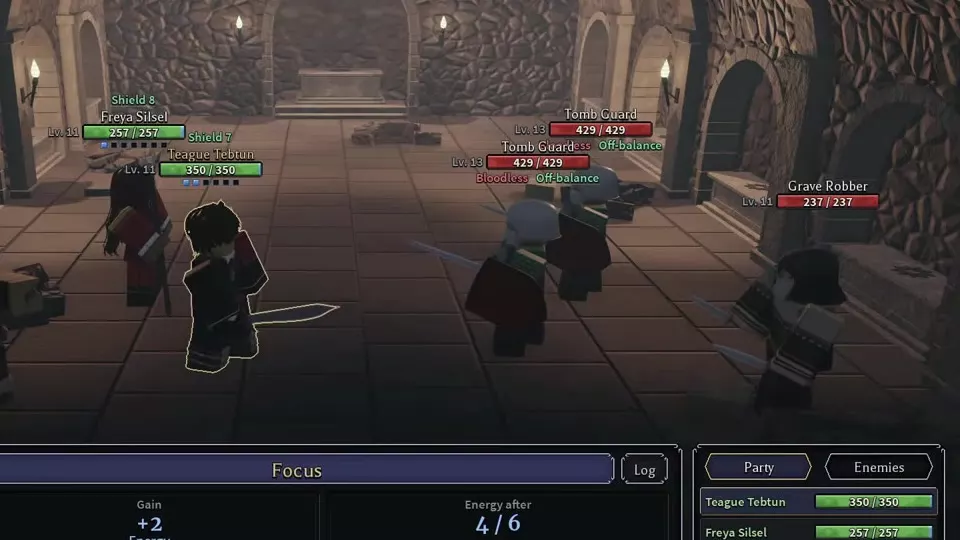
Use Focus when preparing a later action is worth passing up damage now. Its preview gives the projected Energy total and any additional effects from your setup. For example, a character at 2/6 Energy projects 4/6 after a standard Focus; that maximum belongs to that character's setup.
Focus leaves living enemies able to act. At low HP, prioritize a finishing attack when keeping the target alive exposes you to lethal damage. If an ally is preparing Inspire, which increases damage dealt by 20%, Focus before your heavier attack only when you can survive the intervening enemy actions.
Account for your Energy effects
- Spirit: each point adds 0.25 percentage points to the chance of gaining 1 extra Energy per turn.
- Scholar: adds 1 maximum Energy, giving more room to store skill resources.
- Comet Staff: its Level 14 · Tier 2 configuration adds 1 maximum Energy and 1 extra Energy from Focus. That makes Focus restore 3 Energy with this staff's bonus.
- Nightglass Staff: reduces skill costs by 1 Energy and grants 1 Energy on Takedown. It supports spending Energy while finishing enemies.
- Saga: reduces skill costs by 1 Energy during the holder's current turn.
- Energy on crit: contributions from different items add together, and the effect still triggers when the critical hit kills its target. A critical kill also meets an applicable Takedown condition, allowing both recovery effects to trigger.
- Lie in Wait: Focus grants 1 Counter. A melee hit triggers an Attack in return and consumes 1 Counter; an enemy hit by that counterattack receives Taunted for 1 turn.
Enemy effects also affect the budget. When a skill hits Gravecaller with Spellbreaker, its user loses an additional 1 Energy. Include that loss when planning the following action.
Spend actions on the right enemies
Read upcoming enemy turns alongside projected HP. Removing a supporting enemy reduces the number of enemies left to act. In a party, name the target: let one teammate finish a wounded enemy while another spends a stronger skill on a healthier threat.
- Shell: the first hit against that enemy each round deals 50% less damage. Use a lower-value hit to consume the reduction before a stronger follow-up.
- Thorny: melee hits reflect true damage to the attacker, scaling with the enemy's level. Assign a spell user to that target when the party has that option.
- Damage over time: account for active damage and its trigger before spending a finishing action. Burn damages its bearer at turn start.
- Sleep: leave a sleeping enemy alone when the plan is to deny its action. Any damage wakes it, including Burn at turn start; direct your damage elsewhere while preserving that control.
- Unguarded: reserve a valuable hit for its guaranteed critical strike, which cannot be dodged or blocked. Coordinate who consumes it; Unguarded works once per round on the same enemy.
For a full division of support, control, and damage across teammates, follow Party Composition and Turn Planning.
Practice at the Training Yard
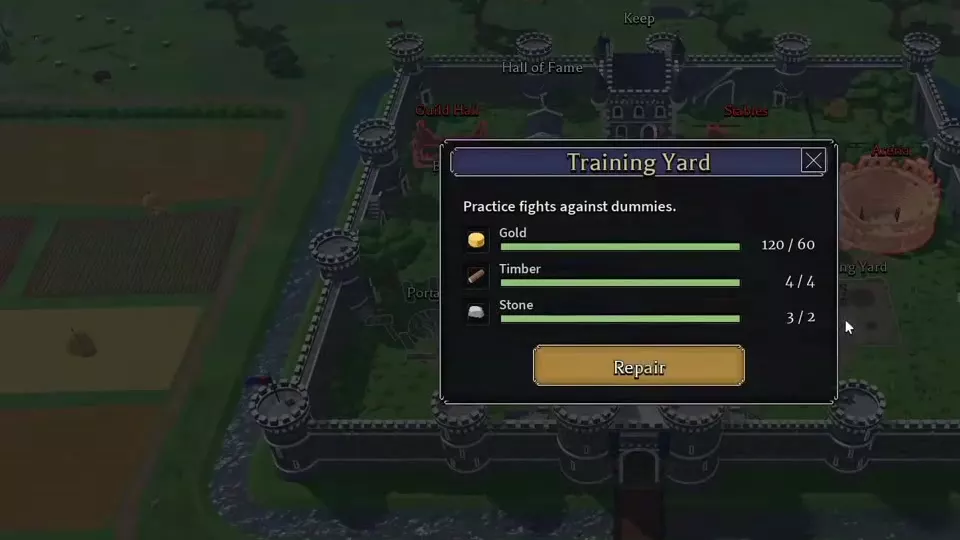
Open Training Yard in the Keep. Its initial repair requires 60 Gold, 4 Timber, and 2 Stone. Choose Repair with those resources available to unlock practice.
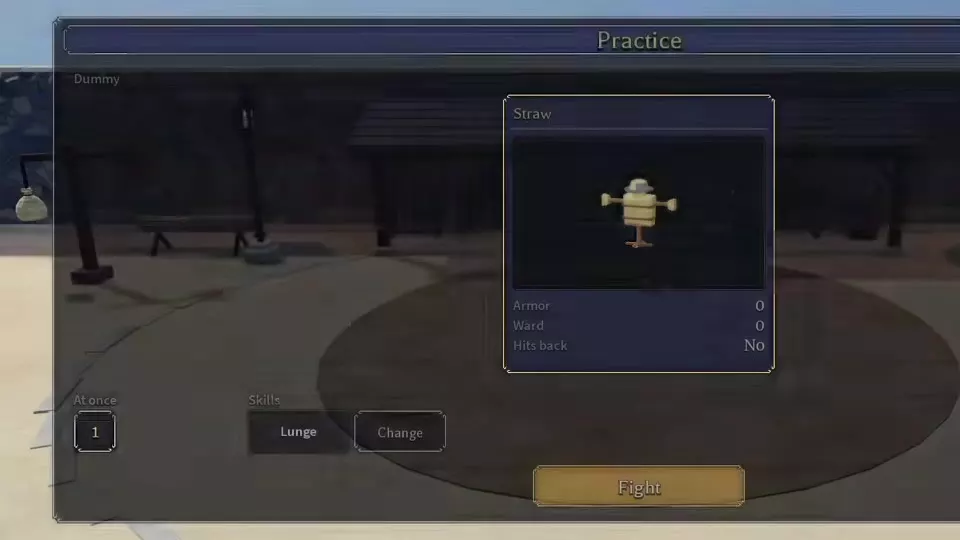
- Enter Practice.
- Inspect the selected dummy's Armor, Ward, and Hits back setting.
- Review At once and the selected Skill. To practice Lunge with one target, use At once: 1 and Skill: Lunge.
- Use Change to adjust the practice selection, then Fight to start.
Straw has 0 Armor, 0 Ward, and Hits back set to No. Use it to practice timing and compare your damage without incoming attacks. Training dummies also take damage from damaging status effects.
Interpret practice damage with those target conditions in mind. A result against Straw's zero defenses does not replace the preview against an enemy with defenses, traits, or active statuses.
Training Yard
- Location
-
Keep
- Repair gold cost
-
60 Gold (Initial repair)
- Repair timber cost
-
4 Timber (Initial repair)
- Repair stone cost
-
2 Stones (Initial repair)
- Practice controls
-
At once; Skill; Change; Fight (After repair) Practice displays the selected dummy, its Armor and Ward, whether it hits back, the At once setting, and the selected Skill. Change and Fight provide the practice controls.
- Status damage supported
-
Yes (Damaging status effects) Training dummies take damage from all damaging status effects.
- Provides a practice target
- Straw (Practice)
Straw
- Target type
-
Training dummy
- Armor
-
0
- Ward
-
0
- Hits back
-
No
- Practice target at
- Training Yard
Skills, Statuses, and Enemy Matchups
- Skills and Loadouts covers equipped abilities and target-specific combo choices.
- Status Effects and Reactions explains damage triggers, control, immunity, and effects consumed by follow-up hits.
- Enemy Traits provides the rules behind defensive traits, retaliation, and control exceptions.
- Enemies and Matchups connects those rules to individual enemies and damage-type choices.