Fallen Lineage Armor and Accessories
Last updated:
Find armor and accessories for defense, recovery, Energy, critical damage, and status effects. Compare each item's required level, Tier, grade, and actual bonuses before replacing equipped gear.
Open Character → Inventory → Gear, hold Shift to compare an item, then click it and choose Equip. Equipment alignment requirements were removed on November 13, 2026; level requirements still apply. Choose HP and defensive triggers for protection, recovery bonuses for sustain, Broadhead Quiver for critical damage, or Barbed Quiver for Status power.
Equipment Slots and Requirements
Gear includes head, torso, and feet equipment, plus rings, amulets, and quivers. Match the item's type to its equipment slot and check its requirements before replacing anything.
- Open Character → Inventory → Gear with the item in your carried inventory.
- Hover over the item to read its required level, Tier, grade, and attributes. Hold Shift to compare it with equipped gear.
- Click the item and choose Equip. Eligible equipment moves into its slot; a level requirement message identifies the level needed if you are too low.
- To take an item off, open its equipped-item actions and choose Remove. The item returns to your inventory.
Equipment alignment requirements were removed on November 13, 2026. Continue to follow the item's level and any class requirements. Frostmere Robe's Tier 1 configuration requires Level 5, while Gloaming Leathers' Tier 2 configuration requires Level 14.
For appearance controls such as hiding equipment parts, use Character Customization and Vanity.
Armor and Accessory Directory
Compare equipment by type, required level, and Tier, then open an entry for its attribute ranges, grade-specific values, effects, and acquisition conditions. Riverstone Ring and Hunter's Quiver have different configurations across Tiers, so match the configuration to the item in your inventory.
Red Ring is an event reward in Catacombs. Choosing Take it grants Edge, strengthening attacks, and Chaotic +1; it also gives the Red Lich Fortify for the first 3 turns of its fight. Choosing Leave it gives Lawful +1. Plan that tradeoff with the Catacombs event choices.
Armor and accessories by equipment slot, required level, and Tier.
28 objects
|
|
Epic | Highwaymen reward example | Torso | 5 Level 5 · Tier 1 | |||||||||||||||||||||||||||||||||||||||||||||
|---|---|---|---|---|---|---|---|---|---|---|---|---|---|---|---|---|---|---|---|---|---|---|---|---|---|---|---|---|---|---|---|---|---|---|---|---|---|---|---|---|---|---|---|---|---|---|---|---|---|
|
An Epic torso item that grants Ward, Armor, Energy chance, and an additional Energy bonus to Focus.
|
|||||||||||||||||||||||||||||||||||||||||||||||||
|
|
Epic | The Rats' Tomb reward example Crypt | Torso | 14 Level 14 · Tier 2 | |||||||||||||||||||||||||||||||||||||||||||||
|
Epic torso armor with Armor, Dodge, and Takedown: Hidden 1.
|
|||||||||||||||||||||||||||||||||||||||||||||||||
|
|
Rare | Patrol battle reward example | Torso | 3 Level 3 · Tier 1 | |||||||||||||||||||||||||||||||||||||||||||||
|
Rare torso armor that provides Armor, Dodge, and increased healing received.
|
|||||||||||||||||||||||||||||||||||||||||||||||||
|
|
Common | Traveller's Cart Available shop offer | Torso | 10 Level 10 · Tier 2 | |||||||||||||||||||||||||||||||||||||||||||||
|
Common torso armor that provides both Armor and Ward.
|
|||||||||||||||||||||||||||||||||||||||||||||||||
|
|
— | Battle rewards or player gifts | Robe | — | |||||||||||||||||||||||||||||||||||||||||||||
|
A robe obtainable as a battle reward and transferable as a gift.
|
|||||||||||||||||||||||||||||||||||||||||||||||||
|
|
Common | — | Head | 1 Level 1 · Tier 1 | |||||||||||||||||||||||||||||||||||||||||||||
|
Common head armor that provides Armor.
|
|||||||||||||||||||||||||||||||||||||||||||||||||
|
|
Common | — | Feet | 1 Level 1 · Tier 1 | |||||||||||||||||||||||||||||||||||||||||||||
|
Common Feet equipment that provides Armor.
|
|||||||||||||||||||||||||||||||||||||||||||||||||
|
|
Common | The Open Tomb reward example Crypt | Feet | 10 Level 10 · Tier 2 | |||||||||||||||||||||||||||||||||||||||||||||
|
Common Feet equipment that provides Armor.
|
|||||||||||||||||||||||||||||||||||||||||||||||||
|
|
Rare | Crypt battle reward example | Feet | 12 Level 12 · Tier 2 | |||||||||||||||||||||||||||||||||||||||||||||
|
Rare Feet equipment that provides Armor and Dodge.
|
|||||||||||||||||||||||||||||||||||||||||||||||||
|
|
— | — | — | — | |||||||||||||||||||||||||||||||||||||||||||||
|
Defensive equipment that grants Shield at fight start and on block, with a chance to inflict Shock on hit.
TipsUse Stormmantle's opening Shield and Shield on block in the tank support build. |
|||||||||||||||||||||||||||||||||||||||||||||||||
|
|
— | — | Helm | — | |||||||||||||||||||||||||||||||||||||||||||||
|
A helm that grants Fortify at fight start and increases damage against Feared enemies.
|
|||||||||||||||||||||||||||||||||||||||||||||||||
|
|
— | — | Boots | — | |||||||||||||||||||||||||||||||||||||||||||||
|
Boots that grant Keen at fight start.
|
|||||||||||||||||||||||||||||||||||||||||||||||||
|
|
— | — | Sabatons | — | |||||||||||||||||||||||||||||||||||||||||||||
|
Sabatons that grant Fortify when the wearer is hit.
|
|||||||||||||||||||||||||||||||||||||||||||||||||
|
|
— | Escort-battle reward example | Boots | — | |||||||||||||||||||||||||||||||||||||||||||||
|
Boots received as an escort-battle reward.
|
|||||||||||||||||||||||||||||||||||||||||||||||||
|
|
Common | — | Ring | 1 Level 1 · Tier 1 | |||||||||||||||||||||||||||||||||||||||||||||
|
A Common ring that increases Max HP.
|
|||||||||||||||||||||||||||||||||||||||||||||||||
|
|
Common | Adventure rewards | Ring | 1 Level 1 · Tier 1 | |||||||||||||||||||||||||||||||||||||||||||||
|
A Common ring that increases Max HP, with different requirements and attribute ranges across Tiers.
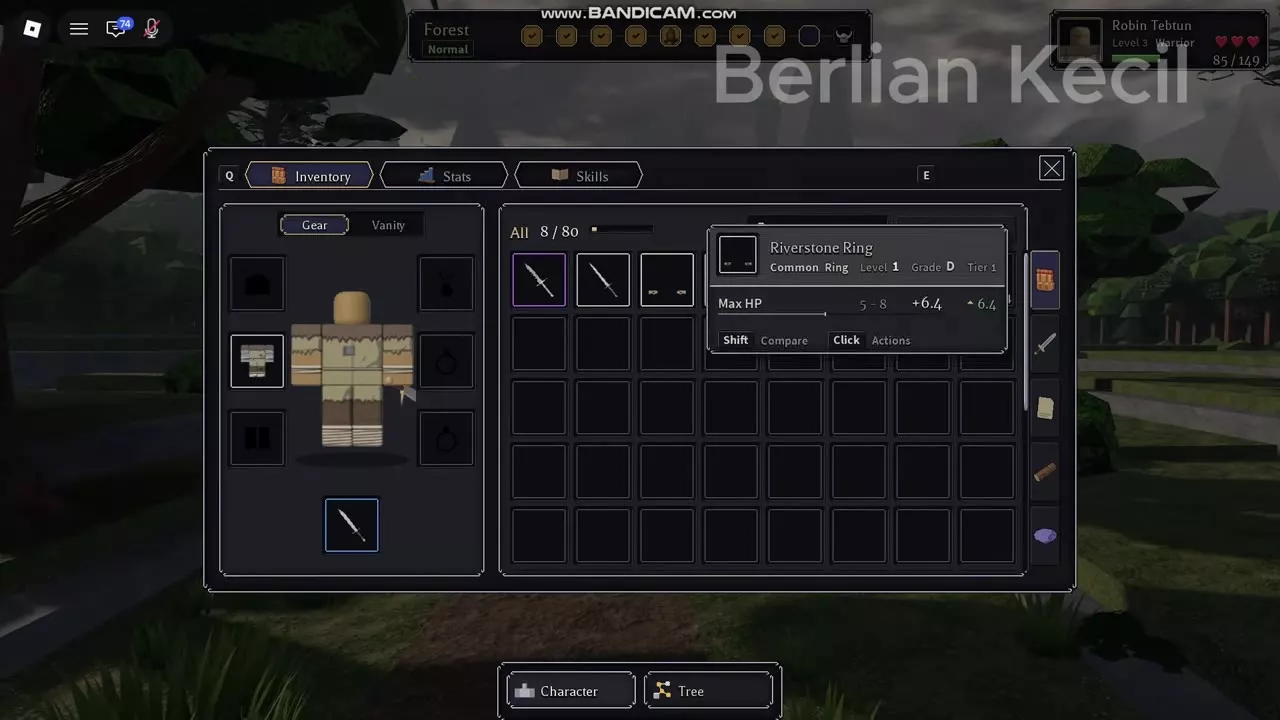
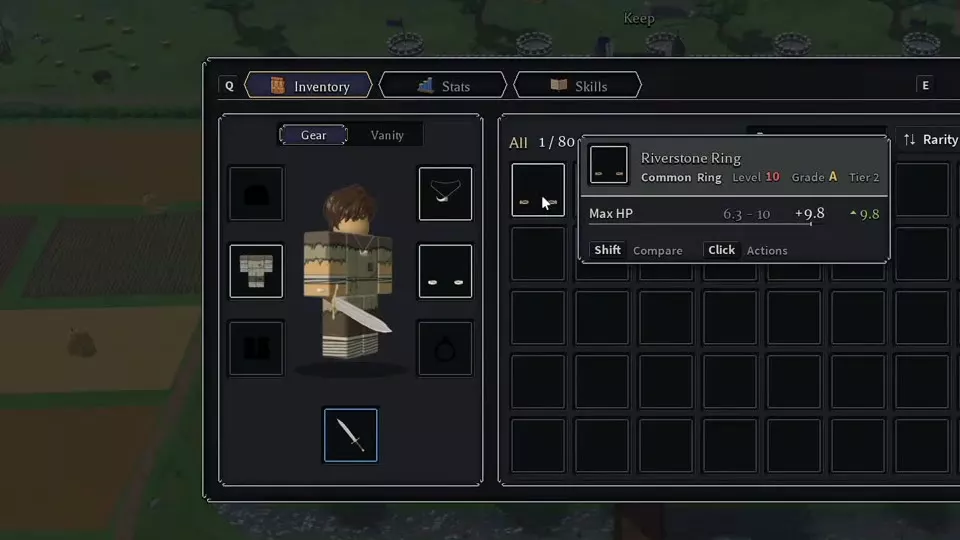
TipsCompare Tier and grade together: the Tier 2, Level 10, grade A example gives 9.8% maximum HP, while the Tier 1, grade D example gives 6.4%. |
|||||||||||||||||||||||||||||||||||||||||||||||||
|
|
Rare | The Keepers' Trade Available shop offer | Ring | 12 Level 12 · Tier 2 | |||||||||||||||||||||||||||||||||||||||||||||
|
A Rare ring that provides Max HP, Lifesteal, and increased healing done.
|
|||||||||||||||||||||||||||||||||||||||||||||||||
|
|
Epic | Gravecaller reward example | Ring | 14 Level 14 · Tier 2 | |||||||||||||||||||||||||||||||||||||||||||||
|
An Epic ring that grants Max HP, Status power, and an additional Poison stack.
|
|||||||||||||||||||||||||||||||||||||||||||||||||
|
|
Common | The Open Tomb reward example Crypt | Ring | 10 Level 10 · Tier 2 | |||||||||||||||||||||||||||||||||||||||||||||
|
A Common ring that increases Max HP.
|
|||||||||||||||||||||||||||||||||||||||||||||||||
|
|
Common | — | Amulet | 10 Level 10 · Tier 2 | |||||||||||||||||||||||||||||||||||||||||||||
|
A Common amulet that increases Max HP.
|
|||||||||||||||||||||||||||||||||||||||||||||||||
|
|
Rare | Battle rewards or player trades | Quiver | 3 Level 3 · Tier 1 | |||||||||||||||||||||||||||||||||||||||||||||
|
A Rare quiver that provides Damage and Status power.
|
|||||||||||||||||||||||||||||||||||||||||||||||||
|
|
Rare | Battle rewards or player gifts | Quiver | 3 Level 3 · Tier 1 | |||||||||||||||||||||||||||||||||||||||||||||
|
A Rare quiver that provides Damage, Crit damage, and Dodge.
TipsChoose Broadhead for critical damage and Dodge when following the Archer critical build. |
|||||||||||||||||||||||||||||||||||||||||||||||||
|
|
Epic | Crypt battle reward example | Quiver | 14 Level 14 · Tier 2 | |||||||||||||||||||||||||||||||||||||||||||||
|
An Epic quiver that provides Damage and has a chance to inflict Curse 2 on hit.
|
|||||||||||||||||||||||||||||||||||||||||||||||||
|
|
— | — | Quiver | — | |||||||||||||||||||||||||||||||||||||||||||||
|
A quiver with on-hit chances to inflict Fear and Blind.
|
|||||||||||||||||||||||||||||||||||||||||||||||||
|
|
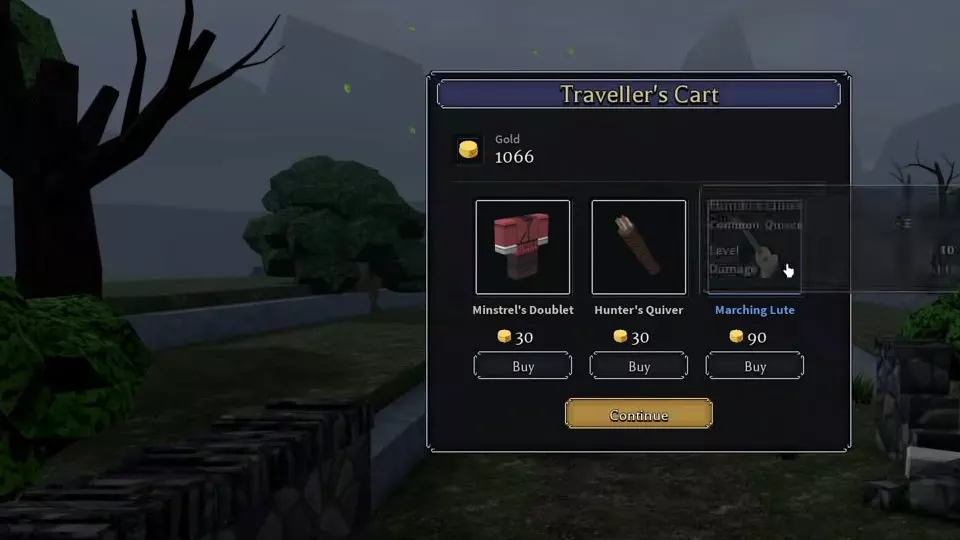
Common | Traveller's Cart Level 10 · Tier 2 · Available shop offer | Quiver | 1 Level 1 · Tier 1 | |||||||||||||||||||||||||||||||||||||||||||||
|
A Common quiver that provides Damage, with distinct Tier configurations.
|
|||||||||||||||||||||||||||||||||||||||||||||||||
|
|
— | The Keepers' Trade Available shop offer | Quiver | — | |||||||||||||||||||||||||||||||||||||||||||||
|
A quiver offered for Gold at The Keepers' Trade.
|
|||||||||||||||||||||||||||||||||||||||||||||||||
|
|
— | — | — | — | |||||||||||||||||||||||||||||||||||||||||||||
|
Equipment with a chance to inflict Bleed 3 on hit.
|
|||||||||||||||||||||||||||||||||||||||||||||||||
|
|
— | The Red Ring: Take it The Red Ring event in Catacombs | Event ring | — | |||||||||||||||||||||||||||||||||||||||||||||
|
A ring in The Red Ring event that strengthens attacks when taken.
TipsTaking the ring gives Edge and Chaotic 1, while the Red Lich starts with Fortify 3. Use the Catacombs choices to plan the boss-opening tradeoff. |
|||||||||||||||||||||||||||||||||||||||||||||||||
Compare Gear for Your Role
Compare the actual configuration
Tier, required level, and grade belong together. A Level 1, Tier 1, Grade D Riverstone Ring grants 6.4 Max HP within a 5–8 HP range. A Level 10, Tier 2, Grade A Riverstone Ring grants 9.8 Max HP within a 6.3–10 HP range.
Against the Level 1, Tier 1, Grade Z Antler Ring's 8 Max HP, those Riverstone examples give 1.6 less HP and 1.8 more HP, respectively. The stronger example also requires Level 10. These are flat HP bonuses, and the grade-specific values describe those individual items.
Hunter's Quiver illustrates the same comparison rule: its Level 1, Tier 1, Grade A example grants 1.9 Damage, while its Level 10, Tier 2, Grade E example grants 1.6 Damage. A higher Tier alone does not settle which individual item gives more of the attribute you need.
Protection and recovery
- HP: Antler Ring, Riverstone Ring, Reeve's Signet, and Waystone Pendant increase your health pool. Choose among eligible items by their actual HP bonuses.
- Opening protection and blocking: Stormmantle grants 30 Shield at fight start and 10 Shield on block. Favor it when blocking is part of your defensive plan. Shield absorbs damage before HP and loses 20% of its current amount at the start of each turn.
- Fortify: Wyrmskull Helm grants Fortify 3 at fight start; Aurelian Sabatons grant Fortify 1 when you are hit. The helm supplies opening protection, while the sabatons trigger from incoming hits. Fortify reduces damage taken by 25%.
- Recovery: Bloodstone Ring combines HP, Lifesteal, and increased healing done. Its Level 12, Tier 2, Grade C example gives 9.3 HP, 2.9% Lifesteal, and 4.2% increased healing done. Duelist's Doublet instead increases healing received, making it useful for a character receiving healing from others.
- Energy: Level 5, Tier 1 Frostmere Robe adds 1 Energy when using Focus and provides Energy chance alongside Armor and Ward. Energy-on-crit bonuses from different equipped items add together and also trigger on killing critical hits.
Healing done, healing received, and Lifesteal support different recovery plans. Choose the bonus that matches how your character restores HP rather than comparing them as interchangeable percentages.
Critical damage and status effects
At Level 3, Tier 1, Broadhead Quiver and Barbed Quiver both provide a 2–3 Damage range. Choose Broadhead for its 8%–12% critical damage and 3% Dodge; choose Barbed for its 5%–8% Status power. Galestride Boots complement a critical-hit plan by granting Keen 2 at fight start.
Status power and applying a status are separate benefits. Choose effects that support the status your attacks and skills use:
- Viper Coil: its Level 14, Tier 2 configuration provides 4%–6% Status power and adds 1 Poison stack.
- Hexbolt Quiver: its Level 14, Tier 2 configuration has a 25% chance on hit to inflict Curse 2.
- Wraith Quiver: hits have a 45% chance to inflict Fear and a 15% chance to inflict Blind.
- Serpent Coil: hits have a 30% chance to inflict Bleed 3.
- Stormmantle: hits have a 25% chance to inflict Shock 2, alongside its Shield effects.
Fear also supports Wyrmskull Helm's 10% increased damage against Feared enemies. Choose that combination when your setup applies Fear; choose Poison or Bleed equipment when those effects drive your damage.
Adventure Sources and Builds
Battle rewards
Inspect Victory rewards after battles. Equipment reward examples include Frostmere Robe after Highwaymen, Duelist's Doublet after a patrol, and Broadhead Quiver after Alpha Wolf.
In Crypt, select The Rats' Tomb → Drive them off, defeat the rats, and inspect the rewards; Gloaming Leathers is one reward example. Other Crypt examples include Reeve's Signet and Poacher's Boots after the Crypt Rats at The Open Tomb, Hexbolt Quiver after Risen, and Viper Coil after Gravecaller. Use the Crypt event routes to find the relevant encounters and shops. These rewards are examples of individual victories, rather than guaranteed drops.
Harold's boots are an escort-battle reward example. Follow the Forest event routes for the escort branches and their choices.
Route shops and player transfers
When a route shop offers equipment you want, hover over the item to inspect its configuration, then choose Buy with enough Gold. Specific offers include:
- Traveller's Cart: Level 10, Tier 2, Grade D Minstrel's Doublet for 30 Gold; Level 10, Tier 2, Grade E Hunter's Quiver for 30 Gold.
- The Keepers' Trade: Fletcher's Quiver for 30 Gold; Level 12, Tier 2, Grade C Bloodstone Ring for 90 Gold.
Those prices belong to the listed offers. Inspect the available stock and item configuration when you reach the shop.
Equipment also transfers between players through Trading Post. Barbed Quiver is a successful trade example; Apprentice's Robe and Broadhead Quiver are successful gift examples.
Build guides
- Use the Warrior and Knight tank support build to combine HP equipment, Stormmantle, and Fortify with party protection.
- Use the Bard support build to coordinate healing, Shield, and instrument effects with support turns.
- Use the Archer critical build to combine Broadhead Quiver and opening Keen with Aimed Shot, target setup, and Energy recovery.