
Fallen Lineage Crypt Events and Choices
Last updated:
Crypt choices trade battles, gold, healing, and alignment against preparation for Gravecaller. Choose branches that support your next fight, and read the encounter type before committing to a familiar name.
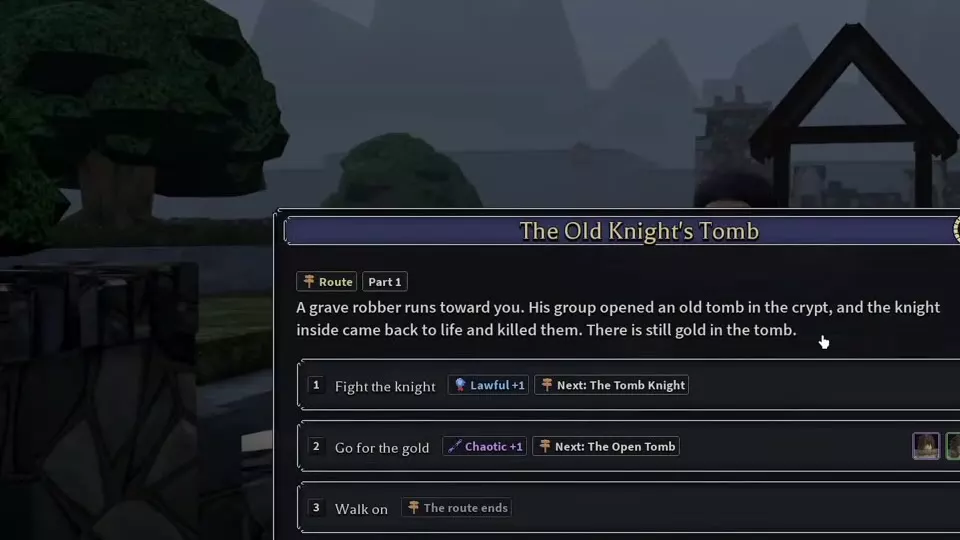
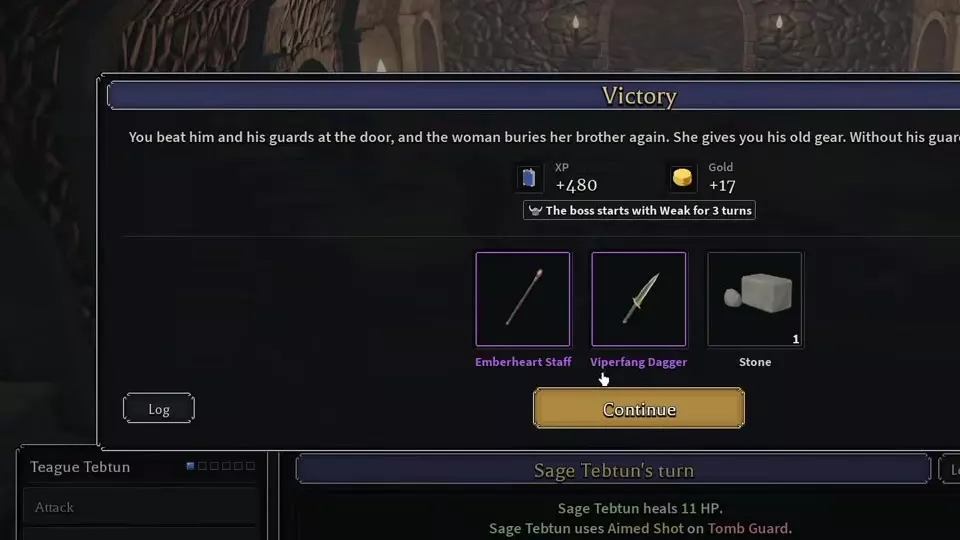
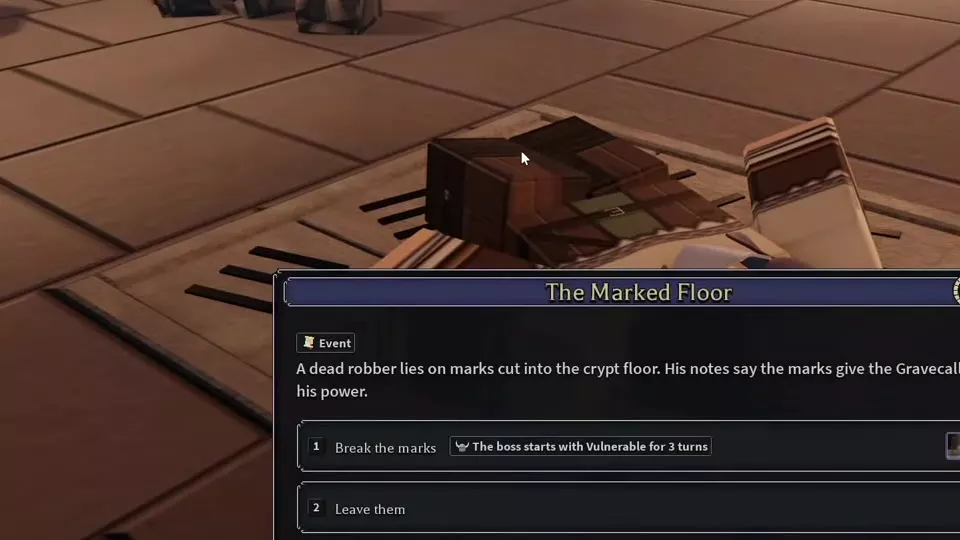
For Gravecaller preparation, complete Put him to rest at The Woman's Brother for Weak during the boss's first 3 turns, or choose Break the marks at The Marked Floor for Vulnerable during the first 3 turns. For healing, deliver The Pilgrim's Pack to the church door to restore 20% HP and gain Lawful +1. The Old Knight's Tomb gold branch grants Chaotic +1 and leads to a three-rat battle in The Open Tomb; Open Tomb labeled Treasure grants a direct reward.
Crypt Choices and Encounter Types
Check the type printed on the card alongside its name, reward tags, Danger, and Reward indicators. Two pairs of Crypt nodes need particular attention:
- Grave Robbers — Event: offers a Lawful battle choice or a Chaotic choice to help dig for gold.
- Grave Robbers — Fight: is a separate combat node tagged XP and Gold.
- The Open Tomb — Route, Part 2: follows the gold branch of The Old Knight's Tomb. Claiming its loot requires fighting Crypt Rats.
- Open Tomb — Treasure: grants gold and equipment directly.
For immediate recovery, look for The Pilgrim's Pack. For boss preparation, look for The Woman's Brother or The Marked Floor. For XP, choose cards carrying the XP tag, such as The Risen and Tomb Guards; Traveller's Cart is a Shop tagged Items.
See Events and Route Choices for the shared route-card and voting controls.
Crypt Event Directory
Use the node type and reward tags to find a branch that fits your goal. Expand a node for its choices, connected route, enemy group, card modifiers, prices, and conditional rewards.
Crypt events, tomb routes, combat encounters, shops, and treasure.
27 objects
|
|
Event | Gold, Items | 1 point Choose Stop him. |
|---|---|---|---|
|
An event involving a servant of Gravecaller raising the dead beside an open grave. Its choices offer a Lawful battle or a Chaotic gold reward.
|
|||
|
|
Event | Gold | 1 point Choose Take them to the Watch. |
|
An event in which two grave robbers offer a share of their finds in exchange for help digging.
|
|||
|
|
Event | XP, Items, Bone | — |
|
An event at a roadside stone tomb occupied by Crypt Rats. Fighting the rats provides access to the equipment inside.
|
|||
|
|
Event | Gold, Barrier | 1 point Choose Give 15 gold and pray. |
|
An event at a church donation box filled with old coins. Players can pay to pray or take the coins.
|
|||
|
|
Event | Items, Heal | 1 point Choose Carry it to the church door. |
|
An event involving a pilgrim's abandoned pack. Delivering it to the church door provides healing and Lawful alignment.
|
|||
|
|
Event | Boss | — |
|
An event involving markings that empower Gravecaller. Breaking the marks gives the boss an opening Vulnerable debuff.
TipsBreak the floor to give Gravecaller Vulnerable 3, then use the opening damage window in the Gravecaller strategy. |
|||
|
|
Event | XP, Items, Bone | — |
|
A Crypt event node tagged with XP, equipment, and Bone rewards.
|
|||
|
|
Event | Stone | — |
|
A Crypt event node carrying a Stone reward tag. |
|||
|
|
Route | Items, Lawful, Chaotic | 1 point Choose Fight the knight. |
|
The first part of a route involving an awakened tomb knight and treasure left inside the tomb.
|
|||
|
|
Route | Gold, Items | — |
|
The second part of the gold branch from The Old Knight's Tomb. Crypt Rats occupy the open tomb and must be fought to claim its loot.
|
|||
|
|
Route | Items, Boss | — |
|
A route in which a woman asks the party to put her revived brother to rest at the crypt entrance. Completing its battle weakens Gravecaller's opening.
TipsChoose to put the brother to rest and defeat the two Tomb Guards to give Gravecaller Weak 3. Check each guard's Off-balance and Steadfast before spending a heavy hit. |
|||
|
|
Elite | XP, Gold, Buff | — |
|
An Elite encounter against two Tomb Guards and one Crypt Rat.
|
|||
|
|
Elite | XP, Gold, Buff | — |
|
An Elite encounter against two Tomb Guards and a Grave Robber. Its card displays modifier combinations alongside XP, Gold, and Buff tags.
|
|||
|
|
Fight | XP, Gold | — |
|
A Fight node against Risen enemies, offering XP and Gold.
|
|||
|
|
Fight | XP, Gold | — |
|
A Fight node in a churchyard against Risen enemies.
|
|||
|
|
Fight | XP, Gold | — |
|
A Fight node combining a Grave Robber with two Crypt Rats.
|
|||
|
|
Fight | XP, Gold | — |
|
A Crypt Fight node offering XP and Gold.
|
|||
|
|
Fight | XP, Gold | — |
|
A Crypt Fight node tagged with XP and Gold.
|
|||
|
|
Fight | XP, Gold | — |
|
A Crypt Fight node tagged with XP and Gold.
|
|||
|
|
Fight | XP, Gold | — |
|
A Crypt Fight node tagged with XP and Gold.
|
|||
|
|
Fight | XP, Gold | — |
|
A Crypt Fight node tagged with XP and Gold.
|
|||
|
|
Fight | XP, Gold | — |
|
A Crypt Fight node tagged with XP and Gold. |
|||
|
|
Fight | XP, Gold | — |
|
A Crypt Fight node tagged with XP and Gold.
|
|||
|
|
Shop | Items | — |
|
A shop node selling equipment for Gold. Players can inspect item attributes, buy equipment, and continue to route selection.
|
|||
|
|
Shop | Items | — |
|
A Crypt shop node tagged with Items.
|
|||
|
|
Treasure | Gold, Items | — |
|
A Treasure node that grants a direct reward of gold and equipment.
|
|||
|
|
Treasure | Gold, Items | — |
|
A Crypt Treasure node tagged with Gold and Items.
|
|||
Alignment and Tomb Routes
Choose Lawful, Chaotic, or recovery
- The Acolyte: choose Stop him for Lawful +1 and a battle. Choose Take his gold for Chaotic +1 and gold without fighting the acolyte. Walk on is the third option.
- Grave Robbers — Event: choose Take them to the Watch for Lawful +1 and a battle. Choose Help them dig for Chaotic +1 and a share of the gold. Walk on is the third option.
- The Coin Box: choose Give 15 gold and pray to spend 15 Gold and gain Lawful +1. Choose Take the coins for Chaotic +1 and gold. Its card carries Gold and Barrier tags.
- The Pilgrim's Pack: choose Carry it to the church door for Lawful +1 and 20% HP recovery. Choose Keep what is inside for Chaotic +1.
Choose the church delivery when healing is the immediate priority. For Lawful alignment without taking the Acolyte or Grave Robbers battle branch, the Coin Box prayer costs 15 Gold. For Chaotic alignment and gold without the acolyte battle, take his gold.
Use the Super and alignment guide to connect these alignment gains to specialization unlocks.
Follow The Old Knight's Tomb
At The Old Knight's Tomb — Part 1, choose between three branches:
- Fight the knight: gain Lawful +1 and continue to The Tomb Knight.
- Go for the gold: gain Chaotic +1 and continue to The Open Tomb.
- Walk on: end the route.
To pursue the gold branch:
- Choose Go for the gold in Part 1.
- Continue and vote for The Open Tomb — Route, Part 2.
- Choose Drive off the rats to fight three Crypt Rats. Leave it is the alternative.
- Defeat the rats, collect the rewards, and select Continue.
The three Level 11 rats had 88 HP each in a Normal encounter and 114 HP each in a Nightmare encounter. Budget for the rat battle when choosing the gold branch.
One Nightmare completion awarded 840 XP, 120 Gold, Reeve's Signet, and Poacher's Boots. A separate completion awarded 840 XP, 124 Gold, Minstrel's Lute, Hunting Bow, Traveller's Lute, and Bone ×2. These are separate reward examples.
The Rats' Tomb and direct treasure
The Rats' Tomb is a separate Event at a roadside stone tomb. Choose Drive them off to fight the Crypt Rats for access to the equipment inside, or choose Leave it. Its Level 11 rats had 88 HP, Flammable, and Exposed. One completion awarded 420 XP, 23 Gold, and Gloaming Leathers.
For a direct reward, choose Open Tomb labeled Treasure. A Nightmare card displayed Danger 0 and Reward 3; one completion granted 60 Gold and Herald's Lute.
Prepare Gravecaller Through Events
The Woman's Brother: Weak 3
Choose Put him to rest, then defeat the two Tomb Guards at the crypt entrance. Completing the battle makes Gravecaller start with Weak for 3 turns. Walk on is the alternative branch.
Choose this route when the party is ready for the guard battle and wants Weak for the boss opening. One completion also awarded 480 XP, 17 Gold, Emberheart Staff, Viperfang Dagger, and Stone ×1.
The Marked Floor: Vulnerable 3
Choose Break the marks to destroy the markings that empower Gravecaller. The boss starts with Vulnerable for 3 turns, increasing damage taken by 25%. Leave them is the alternative.
Use this opening for concentrated damage: prepare your equipment and spend available points during the pause before the boss fight, then commit damage while Vulnerable is active.
Choose Encounters and Shop Offers
Compare the enemy groups
| Encounter | Enemy group | Type |
|---|---|---|
| The Crypt Door | 2 Tomb Guards + 1 Crypt Rat | Elite |
| Tomb Guards | 2 Tomb Guards + 1 Grave Robber | Elite |
| The Risen | 2 Risen | Fight |
| The Open Churchyard | 3 Risen | Fight |
| Robber and Rats | 1 Grave Robber + 2 Crypt Rats | Fight |
The Risen is the lighter Risen matchup by enemy count. In Nightmare encounter examples, both it and The Open Churchyard used Level 12 Risen with 278 HP each and Bloodless. Bloodless prevents Bleed and Poison, so choose damage that does not depend on either effect.
Robber and Rats gives Fire damage a useful target: Flammable Crypt Rats take 25% increased Fire damage. In a Nightmare encounter, the Level 11 Grave Robber had 196 HP, while each Level 11 rat had 114 HP, Flammable, and Exposed. If you put a surviving rat to sleep to gain preparation time, coordinate before attacking it: damage ends Asleep.
The Crypt Door adds a rat to the two-guard fight. Remove the rat to reduce active attackers while preparing strong individual hits against the guards. Tomb Guards' Off-balance triggers Stun for 1 turn when one hit deals at least 15% of maximum HP, unless Stun immunity is active. Check Steadfast before committing a control skill. Bloodless prevents Bleed and Poison on the guards; Burn still damages them, but also wakes sleeping targets.
Read the elite modifiers
The Crypt Door and Tomb Guards carry XP, Gold, and Buff tags. Their displayed modifier combinations change the encounter decision:
| Encounter | Configuration | Modifier | Paired modifier |
|---|---|---|---|
| The Crypt Door | Normal example | +25% damage | — |
| The Crypt Door | Nightmare example | +20 Armor | +15% dodge chance |
| Tomb Guards | Thorns configuration | 4 Thorns | +15% dodge chance |
| Tomb Guards | Ward configuration | +20 Ward | +30% maximum HP |
| Tomb Guards | Shield configuration | 25 Shield | +25% damage |
The Normal Crypt Door example displayed Danger 4 and Reward 4. Its two Level 13 guards had 308 HP each, and its Level 11 rat had 99 HP. In the Nightmare Armor-and-dodge configuration, the guards had 389 HP each and the rat had 125 HP. Use each guard's actual maximum HP for the Off-balance threshold rather than reusing a damage target from another configuration.
The Tomb Guards Ward and Shield configurations displayed Danger 4 and Reward 4. In the Shield configuration, both guards and the Grave Robber begin with 25 Shield each. Account for all three shields when planning your opening. In the Thorns configuration, Thorns is also present on the enemies after entering combat.
Choose elites for their XP-tagged combat opportunity when the party can handle the enemy group and displayed modifiers. Choose a shop when the immediate goal is an equipment purchase.
Traveller's Cart offers
At Traveller's Cart, hover over a product to inspect its type, level, grade, tier, and rolled attributes. Select Buy beneath the desired item, or select Continue to return to route selection without purchasing.
A three-item stock offered these prices and configurations:
| Item | Price | Type | Level | Grade | Tier |
|---|---|---|---|---|---|
| Minstrel's Doublet | 30 Gold | Common Torso | 10 | D | 2 |
| Hunter's Quiver | 30 Gold | Common Quiver | 10 | E | 2 |
| Marching Lute | 90 Gold | Rare Two-Handed Lute | 12 | C | 2 |
- Minstrel's Doublet: this offer had 3 Armor and 3.4 Ward, with displayed roll ranges of 2.5–3.8 for each. Consider it for a torso upgrade that adds both defenses.
- Hunter's Quiver: this offer had 1.6 Damage, with a displayed range of 1.3–2.5. Compare it with your equipped quiver before spending the 30 Gold.
- Marching Lute: this Bard weapon had 24.5 Damage and 7.5% Energy chance, with displayed ranges of 22.5–27.5 Damage and 5%–8% Energy chance. It costs three times as much as either other item in this stock, so reserve the purchase for a Bard who benefits from the upgrade.

Crypt Enemies and Gravecaller
- Enemies and Matchups covers enemy attributes, Tomb Guard control, and damage-type matchups.
- Gravecaller Strategy covers the boss's attacks, opening damage window, and second phase.
- Weapons compares weapon types, requirements, and effects for Crypt loot and shop purchases.
- Armor and Accessories covers defensive equipment, rings, and other equipment rewards.